


Curator Clip Link is an application you can use to quickly and easily search for media by entering or choosing from keywords.
Clip Link is perfect for editors and journalists who might need quick access to relevant assets without knowing what exactly they’re looking for, or where it’s stored.
This guide will help you start using Clip Link to improve the way your business works with media.
For an overview video explaining some of the things you can do in Curator Clip Link, click here.
Overview of Clip Link's user interface
Clip Link at a glance

1. Search, Search Operators, Advanced Search
Search: Simple search for an asset name or asset with metadata of the search text
Search Operators: Expand your simple search with multiple asset names or assets with metadata of the search text in one search and tell Curator how you want the results produced in the assets pane.
Advanced search: Custom search queries around specific metadata tags and groups of metadata
Please see the relevant sections below for more information on each of these.
In the Asset Pane, you are able to hover over an asset thumbnail to reveal the metadata of the search you submitted with specific metadata highlighted matching your search term(s).

2. Filters or Folders
You can switch between how you view your assets in the asset pane, choosing between:
- Filtering by Metadata in the filter panel. This allows you to customize the filter panel options of metadata
- Viewing by folder path and location.
3. Asset Types
Ensure the asset pane only displays results of one/many asset types you want to review:
- Video
- Audio
- Image
- Bookmark
- Sub clip
- Collection
- Folder
4. Asset Pane
The asset pane displays your asset library, allowing you to select assets, open an asset to view, create sub clips from, and/or log. You can view the asset pane in grid/list view, paginate between pages and choose how many results per page you wish to view. You are also able to sort by a metadata tag. The Asset Metadata pane on the right side and the filters and folders pane on the left side can be hidden for you to utilize the entire width of the screen for your asset pane.

5. Create collection
A Collection is a selection of assets you can group together ready for a specific task, action, or identification. You are also able to group one asset in multiple collections. Uses of a collection could include the following:
- Preparing assets for an edit/editor
- A tv series/programme
- assets of a sports player
- Sharing with colleagues
For more information on collections, please refer to the Collections and Productions section below.
6. Cart
The cart is a holding/marking area for assets that you wish to task/action. This may be useful when handling multiple assets which you want to identify easily from within multiple collections.
7. Activity Log
Any processes taking place on an asset, or the creation of anything in Curator can by monitored in the Activity log.

8. Desktops
Host multiple Clip Link tasks/searches at the same time using multiple Desktops.

9. Asset menu
You are able to select a menu against each asset thumbnail that provides a host of options to navigate your asset(s) selected. The options provided in the menu are built into Curator. And, you are able to build in your own custom options and workflows.

10. Asset metadata
Without having to open an asset, you are able to show/hide the metadata view in the Asset pane that details all of the metadata tags edited or empty of an asset. You can filter your view of the metadata of the asset selected by freetext and metadata view. You also have the option to edit the metadata in this area as well.
Searching in Clip Link
When you first log in to Clip Link, you’ll see a screen like this.

If you know what you’re looking for, you can type in a keyword to see all assets which have been tagged as relevant to that word. You can also click the grey saved searches icon ( ) to view any pinned searches your company may have created for you at an admin level.
If you’re not sure exactly what you’re looking for, simply click the search icon ( ) to view the entire library of assets that you have access to. To find what you need, select the media categories you are interested in browsing assets for using the icons on the left side of the screen.
You can perform multiple separate searches by clicking the + icon at the bottom left-hand side of the screen. Each new search added in this way will appear in a separate tab at the bottom of the screen.
 Click on a tab to switch to that search. The active tab will be highlighted.
Advanced search and Saved searches
As of Curator version 3.5.1, you have the ability to perform advanced searches in Clip Link and view saved searches.
Advanced Search
To access Clip Link's advanced search functionality, click on the advanced search icon ( ) in the search bar to expand it.
From here, you can click Add term to focus your search more specifically on selected metadata terms, or click Add group to create a grouped search.
Clicking Add term allows you to select from a list of metadata terms stored within Clip Link.

Slightly different choices will be available to you depending on the metadata term you have selected.
For example, if you select the Rating term from the drop-down list, three drop-downs will appear for this term.

The left-hand drop-down displays the term you have selected - from here, you can change your selection.

The middle drop-down allows you to select an operator - in this case of an enumeration (Enum type metadata), you can select from Is, Has any value, Is not, and Has no value.

If you have selected Is or Is not, the right-hand drop-down will then display a list of available rating values for you to choose from in order to narrow down your search.

Adding a group allows you to create grouped search criteria containing multiple terms. A set of grouped search criteria will be contained within a box on the screen.
![]()
When you have added multiple search terms to a group, a drop-down at the top of the grouped search criteria will appear.

This allows you to specify whether the search will include only results matching ALL of the criteria you have specified here (with And selected), or whether it can display search results matching just one of the terms you have specified within the group (with Or selected).
Grouped searches will be nested underneath any search criteria you enter by selecting Add term - this criteria can be thought of as a group that exists inside a bracket or parentheses. You can drag your grouped search to move it using the icon at the top right of the box containing that group ( ).
).
NOTE: It is useful to try to keep your search query as simple as possible, as a large number of nested groups may lead to an overly complex search query, allowing more room for error.
You can add multiple metadata terms and use different operators for each term/group.
To remove a term from your search query or group, click the X to the right of that term ( ). To remove a group, select Remove group from the bottom of the box surrounding the group. To remove all of the search criteria you have added for the advanced search, click Clear all.
Please note that when performing an advanced search for DateTime metadata (e.g. Created Date, Modified Date, etc) with a known value range search should be performed by setting Is Between / Is Not Between from the dropdown menu in most cases.
This is because it is not currently possible to set seconds in the values to search for (even though 00 seconds will appear in the accepted value box above). It is only currently possible to search against a Date and HH:MM at 00 seconds and an exact search for DateTime (Is Exactly, Is Not) can only be used in the cases where searched for DateTime does not contain seconds (or is exactly 00 seconds).
Saved searches
The saved searches drop-down can be accessed by clicking on the saved searches icon ( ). This drop-down displays a scrollable list of previously saved searches, as well as pinned searches and a button allowing you to quickly filter your results by the newest assets.

Clicking on one of the saved search entries in the list will filter the results displayed in Clip Link accordingly.
To save a search execute a search build of any of the possible elements, see How to search within Curator, once the search results are displayed, click Save current search at the bottom of the saved search drop-down. A pop-up will appear, requesting a search name and description.
NOTE: As it is possible for more than one user to save an identically-named search, it is useful to add a description to any search query you save where appropriate in order to help identify that saved search in the list. Saved search descriptions are visible as a tooltip when hovering over that search.
To delete a saved search, click the delete icon to the right of that entry ( ). A pop-up will then appear asking you to confirm you want to delete the saved search.
Please note that you will only be able to delete saved searches you have created unless you are logged in as a system administrator. Any saved searches you are unable to delete will have a greyed out delete icon to the right of them.
Clicking the Prev or Next buttons beneath the list of saved searches allows you to switch between different pages of saved search entries (where multiple pages exist).
Any saved searches that have been added to your favourites will be differentiated from other saved searches in the list by the highlighted green star icon to the left of the search entry ( ). To add a saved search from the list to your favourites or remove a saved search from your favourites, simply click on the star icon to the left of that search.
You can filter by your saved searches or favourites clicking on one of the options at the top of the list. The option you have selected will then be highlighted in green.

The Pinned Searches section of the drop-down displays the newest assets by default. Clicking Newest assets will filter Clip Link's search results so that the newest assets are displayed first.
The site administrator can also configure pinned searches to display custom search criteria, if desired.

To do this, pinned searches will need to be enabled via the web.config file. Please refer to this article for more information on enabling pinned searches.
Managing search results
Asset type
It's helpful to understand how to manage your search results once you've made one. Therefore, using the Asset Type selector (Located in the top left-hand corner of the page) will help you do this.

By default, all asset types are enabled, illustrated by the green icons shown above. If you wanted to remove any asset type from the returned search, simply click the icon of your choice and it will turn grey (Updating the search results dynamically). Should you only be looking for a certain asset type, you can speed up the process by holding the CTRL or Command key and then clicking the asset type of your choice. This will turn all the asset types grey (I.e disabled) apart from the selected type. Easy!
Asset View
Once you've filtered the assets down, you can use the asset view selector (Located in the top right-hand corner of the page) to toggle between grid view and list view.

The default, grid view, gives a thumbnail representation of each asset, able to be resized using the slider to the left. Whilst the list view gives a more detailed look at the assets, using metadata to help you find the right one. One thing to note here is that additional metadata columns can be added in this view by pressing the 'Columns' menu just above the asset list.
View Proxy
After finding an asset in Clip Link, you can easily watch it back and ensure it's right for you. To do this, just double-click on the asset and the pop-up proxy player will show.

All proxies within Curator are streamed, meaning you never have to download before playing back. Therefore, feel free to scrub through the video and use the advanced player tools without having to wait!
Context Menu Options
Right-clicking an asset, or a selection of assets, will bring up the context menu. This menu allows you to interact with the asset(s) in a number of configurable ways:

- Share Asset Links (Get link to asset)
- Create Logs or open another configured application (Open with >)
- View and Update Metadata (Edit/View Metadata)
- See the asset within its folder in the Curator folder structure (Navigate to Folder)
- See any clipmarks that have been created for this media (Show Clipmarks)
- Show folders and collections this asset has been added to (Show asset locations)
- Use Plugins
Using search operators
It is possible to use the logical operators directly within the Simple Search. The difference between these and Advanced Search is that a simple search applies to all values stored in the Curator while Advanced Search selects specific metadata making the search much more specific.
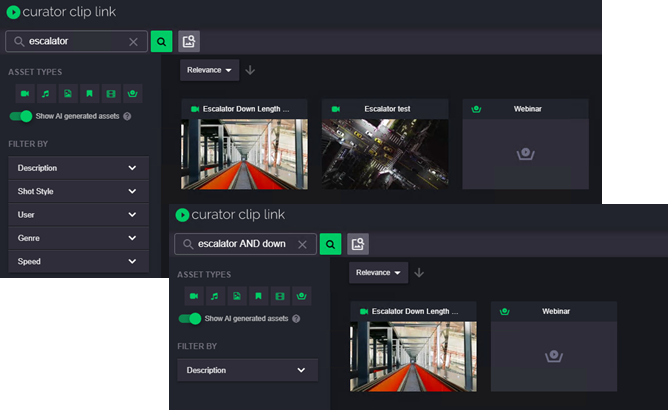
The AND operator
If you want to search for an asset you can use the AND operator to search for assets that must contain metadata that has both values you have searched for. This can significantly reduce the number of results returned. The example below highlights this on a smaller scale. In this example, a search for the term escalator has been performed which has brought back three results. For this example, we want to find shows of a down length shot, so we search for the following - escalator AND down. Now, only assets that have both escalator and down in the metadata will be returned.
The OR operator
By default when searching and you use more than one word, you are effectively using the OR function/operator. The search will return results on any asset that has metadata consisting of either word. In the example below, it is searching for Escalator OR Down. This search will bring back results that have either of these words present in the metadata. You can also see in the example where the OR operator is removed that the same results are returned, so it is useful to remember this when searching.

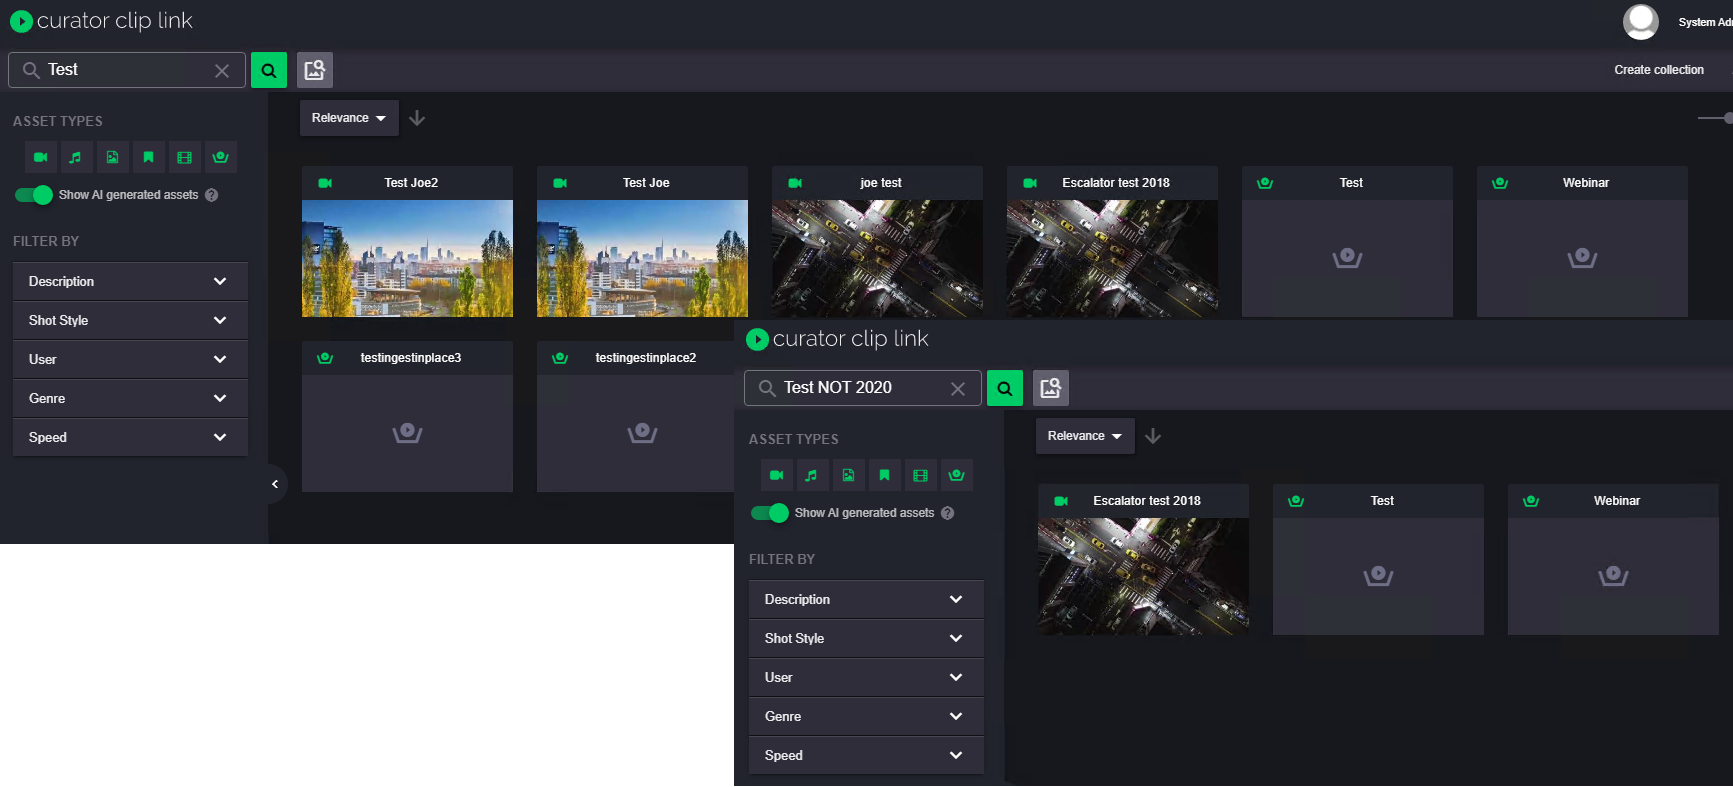
The NOT operator
The use of NOT in a search excludes all of the words following it. This is useful if there is specific metadata you do not want to include in your search. An example of this might be a specific year that you want to ignore that you know is present in the metadata. In the example below, searching for Test returns multiple results, however, the NOT operator is used to omit content containing the word 2020, to exclude results containing that term from the search.
Speech Marks
To search for assets that contain the results of an exact string, we can wrap our search string with speech marks. This tells Curator that the whole string needs to be present for any asset to be returned. This is useful if you know the name of the asset or if there is a specific naming convention that is used.

Using this technique, Curator now only returns two assets, both having the full string "Extreme Sports" in either the asset name or linked metadata.
Negative search
Using the negative search technique helps you tell Curator what information shouldn't be returned for your asset search. Taking our Extreme Sport example, we may be looking for assets that have Extreme Sport in the name but are not related to rock climbing. To do this, our search string would become - "Extreme Sport" AND -"Rock Climbing". The - (minus) sign in front of "Rock Climbing" tells Curator not to return any assets that contain this.

Wildcard searches
If you use the asterisk symbol (*) in your search, Curator will search for everything containing the characters or word(s) preceding the asterisk (the only exception to this is in Clip Select, where it will search for everything in the selected folder). So, for example, searching for the word educat* will bring back results containing all of the variable endings of this word, including educate, educator, education, educating, educational, etc. You can also use asterisks against populated metadata names in advanced searches: for example, searching for a TESTMETADATANAME=* will find all assets that have TESTMETADATANAME populated.
Managing pinned search homepage filters
Due to the large number of searchable filter options/assets available within Clip Link, it is often beneficial to set up quick filters, or Pinned Searches, improving efficiency for users who may continually use the same set of filter options.
If configured, this functionality adds clickable images to the front page of Clip Link which, when clicked, automatically add customized search terms to the user's URL.

Installation Steps
- Make a list of beneficial pinned search criteria you would like to implement.
- Acquire individual logos that will be used on the front page, sizing the images equally.
- All images will need to be housed on the server where Clip Link is configured and placed, in the following location:
- \CuratorClipLink\Content\Images\PinnedSearches
- All images will need to be housed on the server where Clip Link is configured and placed, in the following location:
- Open the web.config file in your preferred text editor.
- Find the PinnedSearches section.
- Read the commented out section for in-depth information.
- In this example an IPV pinned search is being created:
- <add imageFileName="IPVLogo_Small.png" tooltip="IPV Search" searchParameters="?q=*&assetFilter=159&f=W3siTmFtZSI6InBhcmVudC1CcmFuZCIsIlZhbHVlIjoiSVBWIiwiVHlwZSI6IkVudW0ifV0%3D" />
- To populate searchParameters:
- Log in to Clip Link.
- Select the filter(s) you would like configured within your pinned search.
- Look at the URL.
- Use the text starting with ?q onwards and modify it based on the above example/commented text (Mainly around the use of &’s). An example of this can be seen below:
Before: http://YOURSERVERNAME/CuratorClipLink?q=*&assetFilter=159&f=W3siTmFtZSI6IlZpZGVvQml0UmF0ZSIsIlZhbHVlIjoiMTk2MGtiL3MiLCJUeXBlIjoiVGV4dCJ9LHsiTmFtZSI6IkJyYW5kIiwiVmFsdWUiOiJJUFYiLCJUeXBlIjoiRW51bSJ9XQ%3D%3D
After: ?=*&assetFilter=159&f=W3siTmFtZSI6IlZpZGVvQml0UmF0ZSIsIlZhbHVlIjoiMTk2MGtiL3MiLCJUeXBlIjoiVGV4dCJ9LHsiTmFtZSI6IkJyYW5kIiwiVmFsdWUiOiJJUFYiLCJUeXBlIjoiRW51bSJ9XQ%3D%3D
- Repeat the above for all pinned searches.
- Save web.config.
- Refresh Clip Link and test each pinned search on the home page to ensure functionality.
Selecting an asset

Using the options on the left, you can narrow your search down by asset type, show AI generated assets, and filter search results with a range of settings.
Assets can be displayed as thumbnails or as a list by selecting from one of the two available icons from the top right-hand side of the screen ( ). Asset sizes can be adjusted using the sliding bar (
 ).
).
Once you’ve found an asset you’re interested in, you can click on it to select it.
Right-clicking on an asset allows you to view options for that asset.
Previewing an asset
You can preview an asset by double-clicking the selected asset's thumbnail or pressing Spacebar when the asset is highlighted.

A number of player controls will be available to you on previewing an asset, including:
- Play and Pause
- Playback audio volume
- Audio channel selection
- Scrub bar
The preview monitor can be moved around the screen whilst you navigate the asset pane, allowing you to browse the assets listed in the pane at the same time as previewing the selected asset. Selecting another asset in the asset pane whilst preview is open allows you to change which asset is in preview mode. You can also add an asset in preview mode to your cart.
Asset preview shows up to five metadata of the asset, including Duration and Created date time. You can opt to specify which metadata are displayed by default in asset preview mode by clicking on the settings cog and selecting Preferences.

From here, you can select up to five metadata you wish to appear by default by selecting metadata to display from the drop-down list.

You are able to reorder the selected metadata by clicking and dragging on them, or remove them by clicking on the green remove icon to the right of each metadata listed.
To open the asset with full functionality Asset viewer, select View.
Asset viewer
Once an asset has been selected and opened from the asset pane, the asset viewer will open. The asset viewer is the area to begin viewing your asset and all of its encompassing information, metadata functionality and interlinking assets including bookmarks and sub clips.
Videos will automatically start playback - sub-clips will be shown in the context of complete media, with the green bar showing the area of the video covered by the sub clip and playback starting from the in point. You can navigate videos using the playback controls below the video (see the Keyboard shortcuts section below for a useful list of keyboard shortcuts related to selecting assets and playback controls).
To deselect a selected asset:
a) Click on the background.
b) Press the Esc key on your keyboard.
NOTE: Pressing Esc is not advisable when working in Safari full screen mode.
Asset viewer at a glance

With the asset open, you are able to access the following:
-
Search bar
This provides the ability to search and access your Saved Searches. -
Asset name
This displays the name of the asset. The icon beside the asset name will indicate the asset type in the viewer.
If the currently selected asset is either a bookmark or sub-clip (child asset), you will see the name of the child asset as well as the parent asset.
The asset name and child asset name are hyperlinked for your navigation. -
Asset play
The content of the asset will appear in the centre of the viewer. -
Player controls
The player controls contain buttons to control the playback audio and video as well as tooling to manage the asset including sub-clipping. -
Asset information
Scroll down to reveal the information and switch between:
- Asset Info
- Asset metadata (metadata of the asset open).
- Parent metadata (metadata of the parent asset of the currently selected sub-clip or bookmark).
If the currently opened asset is not a sub-clip or bookmark, then parent metadata will not be displayed. -
Child assets of the open asset
If the asset open is has sub-clips or bookmarks that have been created from the asset (parent) then this area will display a library of child assets without having to search for these separately.
1. Select the arrow chevron to reveal the child assets of the open asset.
2. Select up to 8 child assets or paginate between all the child assets of the open asset.
-
Update thumbnail
You can select any frame from the player bar and update the thumbnail for the asset view in the asset pane of Clip Link. -
Sub-clip and bookmark management
This area is dedicated to the creation and updating of sub-clips and bookmarks. -
Asset Menu
After selecting the three dot menu, the asset menu appears. The menu options are similar to those displayed when an asset or assets are selected in the Asset pane.
-
Related/Locations
Related displays assets with similar metadata to the selected asset.
Locations displays hyperlinks to collections, productions and folders the asset is referenced in and is a part of. This is useful when working with collections (see the Collections and Productions section for more information).
Downloading an asset
As of Curator 3.7.2, provided you have been given permission to do so by your system administrator, you will have the ability to download a single asset at a time.
To download an asset, right-click on the asset you wish to download.
Select Download Hi-res.

Download progress can be reviewed in the Activity Tracker.

Your asset will download to your selected download location.
Search Highlighting
Search highlighting is designed to help you better understand the search results you see in your Curator applications (e.g. Clip Link and the Curator for Adobe Panel). Once you’ve performed your search, you can hover over the asset thumbnails and a hover popup will show you the asset metadata field(s) that matched your search.
The match could be as simple as matching the filename of the video asset, or as complex as matching to AI-generated speech-to-text or object recognition metadata for a sub-clip of a parent clip.
Using Filters
One of the key features of Clip Link is its filter options. These options, if optimized correctly, can help improve content searchability using available metadata.
How to set this up:
1) It is first necessary to understand what Metadata views your Clip Link is pointing to in Curator System Administrator (CSA). To do this, navigate to the relevant Clip Link folder and edit the web.config in your preferred text editor (The default file path is: C:\inetpub\wwwroot\CuratorClipLink).
- Find the line that references SearchFilterViewName or ParentLevelViewName - these should be side by side.
- The values present for the above two add key values will indicate which metadata views Clip Link is using to populate the filter by list.
2) Now the views are known, in a web browser, navigate to the Curator Server Administrator (CSA) website and log in.
- Once you are logged in, click the Metadata Views tab and look for SearchLevelViewin the left-hand list.
- If either ParentLevelView or SearchFilterViewName is not present, you should create these now.
- To do this, click Create on the right-hand side and populate the Name and (if necessary) Description fields. Once happy, click Save.
- With SearchLevelView selected, we can now see what metadata names are connected to this view. Each item selected can become a filter option. Therefore, if you are missing some metadata filter fields, simply find the metadata item (with All Columns or Non-members selected) and tick the Member check box. Once happy, click Save.
- Depending on how you wish for your setup to look, select ParentFilterView and choose the relevant metadata items here too.
- With everything in place, navigate to the Clip Link website, log in and check the filter options. If you cannot see the changes, and you're sure assets are actually using and populating the chosen metadata fields, you may need to clear your cache and try again.

Managing the Facet Filters
One of the key features of Clip Link is its filter options. These options, if optimized correctly, can help improve content searchability using available metadata.
How to set this up:
1) It is first necessary to understand what Metadata views your Clip Link is pointing to in Curator System Administrator (CSA). To do this, navigate to the relevant Clip Link folder and edit the web.config in your preferred text editor (The default file path is: C:\inetpub\wwwroot\CuratorClipLink).
- Find the line that references SearchFilterViewName or ParentLevelViewName - these should be side by side.
- The values present for the above two add key values will indicate which metadata views Clip Link is using to populate the filter by list.
2) Now the views are known, in a web browser, navigate to the Curator Server Administrator (CSA) website and log in.
- Once you are logged in, click the Metadata Views tab and look for SearchLevelViewin the left-hand list.
- If either ParentLevelView or SearchFilterViewName is not present, you should create these now.
- To do this, click Create on the right-hand side and populate the Name and (if necessary) Description fields. Once happy, click Save.
- With SearchLevelView selected, we can now see what metadata names are connected to this view. Each item selected can become a filter option. Therefore, if you are missing some metadata filter fields, simply find the metadata item (with All Columns or Non-members selected) and tick the Member check box. Once happy, click Save.
- Depending on how you wish for your setup to look, select ParentFilterView and choose the relevant metadata items here too.
- With everything in place, navigate to the Clip Link website, log in and check the filter options. If you cannot see the changes, and you're sure assets are actually using and populating the chosen metadata fields, you may need to clear your cache and try again.
The context menu
Throughout Clip Link, you'll also find a handy context menu ( ) . This menu allows you to send assets to various destinations, such as other locations in your organization, archive storage, and create different video formats. The exact options available here will depend on the functionality your organization has chosen.
You’ll see the context menu in various places throughout Clip Link: on individual assets or collections, and also on the toolbar at the top right of the screen. This menu will show you relevant options depending on the asset(s) you have selected. These might include Get link to asset, which allows you to share a selected asset with anyone, or Open with > Curator Logger, which allows you to open the same asset or collections in the logging interface.
Editing asset metadata
Adding metadata to an asset, or assets, couldn't be simpler! Within the main Curator Clip Link interface, simply right-click any asset in the middle pane to bring up the context menu and choose Edit/View Metadata. Performing this action will bring up the Metadata Editor window, where you can see all the metadata you have access to. To change something, simply update the value field and then click Save at the top right.
If you want to edit metadata in bulk for multiple assets at once, simply select the assets you want to edit metadata for before clicking Edit/View Metadata.

Here are some top tips for editing metadata
- White highlighted fields are editable, whilst grey fields are read-only
- You can select multiple assets using common keyboard shortcuts:
- Click and drag
- Ctrl/Cmd + click (to select multiple individual clips)
- Ctrl/Cmd + A (select all)
- Shift + click (to select a continuous range of clips)
- Warning - The Use assets in search result toggle in the top-left hand corner can be extremely powerful, therefore use with caution. This is because it will update the metadata of ALL assets in the search, not just the one loaded
Using the video player
Getting to know the video player can be very helpful, so take a moment to look over the player control breakdown below:

Notes
- To adjust the timecode, enter the required timecode in the hover pop-up box by selecting the clock and adjusting the timecode in the pop-up. Clicking the chevron to the right of this allows you to change the timecode type to a zero base timecode or a standard timecode.
- The playback speed can be adjusted in a number of ways:
- by selecting the playback speed selector box, and clicking on one of the points on the slider, you are able to speed up or slow down/rewind the playback in real time (this will then preview from the video player)
- by selecting the chevron to the right of the setting, you can choose from a list of predefined playback speeds.
- Marking inpoints and outpoints allows you to make starting and ending points for selections and sub-clips from the video. Adjust the player head to the point you want to mark, and then select one of the options to mark that point in the video. The area of the video you have selected will appear directly above the video player as a green segment.

Inpoints and outpoints can be altered by adjusting this segment in the following ways:- Dragging and dropping from the centre of the selection area to different points in the video allows you to move the selection area to a different point in the video.
- The arrows to the left and right of the selection area can be dragged to the left or right to extend or shorten the area of the selection.
- Select the Step Frame buttons to create a slow motion effect.
- Hold down the Skip Forward/ Skip Backward buttons to fast-forward/ rewind the video. Alternatively, click on the Skip Forward/ Skip Backward buttons to advance or go back by 60 seconds
- Selecting Safe margins allows you to create a set of margins for your video, allowing you to preview how much the video will fit visually within the margins of the output type you have selected.
- To view closed captions, select one of the available caption types from the pop-up box.
- To adjust the volume, select the desired volume level from the pop-up box.
- To change audio channel, select an available channel in the pop-up box.
Shift key:
Press the shift key to activate different functionality for the following buttons:
Mark inpoint > Go to marked inpoint
Mark outpoint > Go to marked outpoint
Mark bookmark > Go to bookmark
Keyboard shortcuts
If you’re an editor who needs to navigate through content quickly, you might also find the following keyboard shortcuts useful:
| Space or K | Play / Pause |
| Ctrl + 5 | Play / Pause (only works with 3 or fewer browser tabs) |
| Shift + space | Reverse motion |
| Alt + \ or Option + \ | Play (plays at a normal rate from paused) |
| L K held down + L |
Forward motion, tapping increases the speed Frame step forward |
| J K held down + J |
Backwards motion, tapping increases the speed Frame step backwards |
| Right arrow | Frame step forward |
| Left arrow | Frame step backwards |
| Down arrow | Go to the start of the next scene (Curator Logger only) |
| Up arrow | Go to the start of the prior scene (Curator Logger only) |
| Shift + K | Go to the start of the next scene |
| Alt + K | Go to the start of the prior scene |
| I Shift + I |
Mark in-point Go to marked in-point |
| O Shift + O |
Mark out-point Go to marked out-point |
| B or M Shift + B or Shift + M |
Mark bookmark Go to marked bookmark |
Keyboard shortcuts
If you need to review several assets, you can use the right, left, up and down arrows to select an asset by stepping through the search results or, when in the list view, stepping up and down the list. The first arrow click selects the first asset in the view.
If you need to select multiple assets (e.g. to put them in the Cart, create a Collection, or edit metadata in bulk), you can do so using common Windows and Mac keyboard shortcuts:
- Click and drag
- Ctrl/Cmd + click (to select multiple individual clips)
- Ctrl/Cmd + A (select all)
- Shift + click (to select a continuous range of clips)
- Esc / click on the background to clear the selection

Selecting/de-selecting Asset Types
To narrow down your Clip Link search results, you can filter by Asset Type. You can either de-select each Asset Type in turn, or you can use the Ctrl/Cmd + click on the Asset Type to de-select all Asset Types other than the one you clicked.
Want to search for all Asset Types again? Simply Ctrl/Cmd + click on the Asset Type you're currently filtering by and it will automatically re-select all other Asset Types.

Sub-clips
From Curator Clip Link, you can create sub-clips using a selection from a video asset, allowing you to work on that section of the video separately.
To create a sub-clip:
- Select the video asset you would like to create a sub-clip from.
- From the video player, click on a point in the video to select the start point for your sub-clip, and select the Mark Inpoint button.
- Then click on a separate later point in the video to select your end point for the sub-clip, and select the Mark Outpoint button.

- The area of the video you have selected will appear directly above the video player as a green segment.
The selection area can be altered by adjusting this segment in the following ways:- Dragging and dropping from the centre of the selection area to different points in the video allows you to move the selection area to a different point in the video.
- The arrows to the left and right of the selection area can be dragged to the left or right to extend or shorten the area of the selection.
- With both the start and end points selected, select Create Sub-clip. A confirmation message will appear.
 From here, you can open and edit your sub-clip. When you have made your changes, click Save Changes.
System Tree and Right-Click Functions
Curator Clip Link comes complete with a system tree which can be found on the left-hand side of the UI when the Folders filter is selected.
This article explains the functions of the available options when the Folders filter is being used.
Using Clip Link's system tree and updated asset list, you can drag and drop assets and folders between these two areas and within themselves under the Folders tab.
Note: You cannot drag assets from the Filters tab Asset List into the Folders tab System Tree. You can however cut and paste between the two as described in the new right-click context menu functionality below.

Creating and managing folders from the system tree
From the same left hand system tree, by selecting and right-clicking on a particular folder, you can create new folders within the selected folder, rename the folder, move or delete it.
Note: you must have the correct read/write/delete permissions in order for this functionality to work.

Setting thumbnails from the asset previewer
Thumbnails can only be set within the limits of the start and end frames for sub-clips, and, for bookmarks, only on the bookmarked frame itself. Set the player head in the desired position within these limit and select Set thumbnail highlighted below. This option is deactivated for image type assets.

Right-click context menu functionality
Note: this will only appear for relevant asset types.
From Curator 3.5.1, you're able to right-click on assets to open the plugin's menu. The default out-of-the-box options here are shown below:

- Get link to asset - Copies the URL of the selected asset to the user's clipboard.
- Open with - Opens up the selected asset in another application (the default option for this is Open in Logger. This is configurable.)
- Edit/View metadata - Allows you to edit the metadata of the selected assets or against the assets in the search results.
- Navigate to folder - Navigate to the original asset location.
-
Show clipmarks - Shows subclips/bookmarks for the selected assets in a new tab.
or Show parent asset - For subclips/bookmarks shows media / audio parent asset in a new tab. - Show asset locations - Opens a new tab displaying the folder that the selected asset resides within. This tab will contain further information in future Curator releases.
- Add to cart - Adds the selected assets to the cart.
- Create Collection - Creates a collection, automatically adding the selected assets to a created collection.
- Delete - Only available to those who have the correct permissions set, this will move the selected assets to trash. Assets will be deleted from trash when their purge date has been met.
-
Move Assets (under Folders tab) and Move folder acts like a "cut" option for assets (including folders), before "pasting" them with Place assets into the System Tree or Move to in the Asset List.
Note: If you move an asset and then change the selected folder in the System Tree then you will no longer be able to place the assets. The contents of the "cut buffer" are lost when you change folders. You must therefore place the asset by either right-clicking the destination folder in the System Tree or else a child folder already visible in the Asset List.
Removing assets and restoring from trash
Once an asset has been moved to the trash folder, it will remain in the trash folder until the purge date has been met. Once met, the system will remove the file from the trash folder.
With Curator you have the option to restore a deleted asset to its previous location by finding the asset/s in the trash and selecting Restore.
Alternatively, if you want to remove the assets from the trash folder, where their purge date is set much farther into the future than desired, selecting Remove from Trash will allow the ability to re-set the purge date to the current time/date, removing the file almost instantly.
Collections and Productions
Collections
Clip Link allows you to select a number of assets and add them to a collection. Collections are useful for grouping together assets to be used later or shared with other people in your team.
To create a collection:
- Click on the name of the asset you want to add, or
- drag over a group of assets.
A green tick ( ) will appear on each selected asset. You can then choose to add all of the assets you’ve selected to a new or existing collection by clicking on the context menu and selecting either Create collection or Add to collection.
Once you’ve created a collection, you can search for it by name in any Curator application and immediately access any of the assets within it.
When you navigate to and open a collection (by double-clicking on it), its assets will be marked with an arrow in the top right corner indicating that this is a reference to an original asset, be it media, audio, image or a clip mark:

The right-click menu available for each of these references has many familiar fields - two of these in particular are relevant specifically to references in collections:
- Navigate to original folder - navigates to the folder where the referenced asset resides
- Remove from <name of the collection> - removes the reference from the opened collection

Productions
If your Curator license includes the Edit & Publish Functionality Module, you can use Curator alongside video-editing software like Adobe Premiere Pro. This allows you to create productions and manage your editing projects with Curator. You can find out more about the Edit & Publish Functionality Module in our Productions in the Adobe Panel Guide.
What are Curator Productions?
In Curator, a Production is simply an Adobe Premiere Pro project file (a .prproj) that has been saved into the Curator database. You can think of it as a .prproj file that you can retrieve whenever you want.
How do I start a Curator Production in Clip Link?
Info
Curator Productions can be created in Clip Link and also in the Curator for Adobe Panel. Check out our "Working with Curator Productions in the Curator for Adobe Panel" help article if you're working directly in Premiere Pro/After Effects
Starting a Curator Production in Clip Link couldn't be simpler! Within the main Curator Clip Link interface, simply right-click in the middle pane to bring up the context menu and choose 'Create Production'. Doing this will open up the Create Production pop-up, where you can assign some metadata to go alongside your Curator Production. Once you're happy with your choices, click Ok and Curator will do the rest.
Once a production has been created, it will be searchable from within any Curator application.

Top tips for working with Curator Productions
Make sure to choose the correct Adobe application from the 'Production Type' field, as this assigns a template project file for this application to the newly created Curator Production asset.
Adding metadata to any asset makes the value of it increase significantly! Therefore, always take an extra moment to ensure the metadata is accurate. You'll never know when you or your team may need it.
Add to cart
Carts are a great way of selecting assets when you’re not sure what you want to do with them yet, but don’t want to lose them. Unlike a collection, your assets will remain selected whether you navigate between pages or do new searches.
To add content to your cart:
- Click- or drag- select the assets you want to save for later, right-click, then select Add to cart.
- The Add to cart option will also become available from the toolbar at the top right-hand side of the screen when content is selected.

Administrative functions
Editing folder permissions
Accessing folder details and permissions
Folder details and permissions can be found in Clip Link.
To access folder details and permissions:
- Select the Folders tab (accessible from the top left-hand side of Clip Link).
- Right-click on the folder you wish to look at and select Edit Permissions.

Overview
Folders and their permissions can be edited and managed from the Editing folder permissions screen.

The Editing folder permissions section is split into two parts: the Editing Library section allows you to edit folder details (where applicable), and the Permissions section allows you to apply Read, Write, and Delete permissions on a workgroup-by-workgroup basis, as well as propagating any permissions that are set down into all child folders from the level the permissions are set on.
Editing folder details
Certain folder values may be editable. This may vary depending on your permissions and/or the folder in question. Editable values will be clickable.
To edit a folder value:
- From the Editing section of the Folder Permissions screen, click on an applicable value.
- The field will become editable, allowing you to delete existing text and add new text.

- Click outside the field once you are done editing to confirm your changes.
Editing folder Workgroup permissions
Folder permissions can be edited for each workgroup.
Selecting a workgroup
To make it easier to find a specific workgroup you are looking for from the list:
- From the Workgroup Permissions section of the screen, use the search bar above the list of workgroups to filter down to a specific workgroup.

Editing folder permissions for a workgroup
To edit permissions for a specific workgroup:
- From the Workgroup permissions section of the screen, click and drag on the permission level displayed to the right of a workgroup in order to apply or remove specific permissions to/from just that workgroup, ranging from None to Read, Write, and Delete.

- Changes you make will be highlighted in yellow until you opt to save them (done by clicking the Save button from the top right-hand corner of the screen).
Editing folder permissions for all workgroups
To apply a certain set of permissions to all of the workgroups in your list:
- Either:
a) Click on the button that corresponds to the permission level you would like to set, or
b) Click on the three dot menu to the right of the buttons and select one of the options to apply that permission level.
- Changes you make will be highlighted in yellow until you opt to save them (done by clicking the Save button from the top right-hand corner of the screen).
Applying the changes you have set to child folders
- The Propagate checkbox allows you to propagate changes to all child folders contained within the selected folder so that their permissions match for the workgroup you have selected.

Saving your changes
To save your changes, click the Save button from the top right-hand side of the screen. Alternatively, you can cancel the changes you have made by clicking Cancel.